Managing the VPC with ansible-selvpc-modules

As we’ve mentioned in previous articles, the Selectel Virtual Private Cloud is built on the OpenStack platform.
A lot of our clients are already used to using Ansible, a configuration management system that lets you automate routine tasks. Among its other advantages, Ansible already has a wealth of ready-made modules available, including those for automating processes with OpenStack components (list of modules).
When using the VPC, you must first create a project and reserve its resources. These operations can be performed from the control panel or our API.
Users often have to perform a variety of other operations, include cloning virtual machines, adding or redistributing resources, and creating new users.
To simplify the initial configuration and working with the OpenStack API, we’ve developed the ansible-selvpc-modules package, which includes several ansible modules designed specifically for our service. This will make life easier for anyone who uses our API.
These modules cover the the full range of functions available in the VPC. This means there’s no longer any need to allocate resources manually or with third-party utilities: this can all be done from one playbook.
The ansible-selvpc-modules package includes:
- selvpc_projects – for managing VPC projects
- selvpc_quotas – for managing project resources
- selvpc_limits – for retrieving information on available resources
- selvpc_users – for managing users
- selvpc_floatingips – for managing IP addresses
- selvpc_subnets – for managing subnets
- selvpc_roles – for managing project roles
- selvpc_tokens – for creating keys
- selvpc_licenses – for managing licenses
Below we’ll give package installation instructions and walk you through the full VPC process, from creating a project to launching a virtual machine.
Installation
We create an isolated virtual environment and activate and install the ansible-selvpc-modules package:
$ virtualenv --no-site-packages env
$ source env/bin/activate
$ pip install ansible-selvpc-modules
We also need a few additional packages: shade as a dependency for os_* ansible modules and jmespath to easily parse json (more). We’ll install them from PyPi:
$ pip install shade jmespath
We need a key to use Resell API. Registered Selectel user can get them here.
Now we add environment variables SEL_URL and SEL_TOKEN:
$ export SEL_URL=https://api.selectel.ru/vpc/resell/
// The API version at the time of writing this article is ver. 2
$ export SEL_TOKEN=
Since we’ll be using OpenStack modules for Ansible, we’ll also need the following variables:
$ export OS_PROJECT_DOMAIN_NAME=
$ export OS_USER_DOMAIN_NAME=
To make it easier to access hosts from Ansible, we’ll set the value for the environment variable ANSIBLE_HOST_KEY_CHECKING as False:
$ export ANSIBLE_HOST_KEY_CHECKING=False
We’ve installed all the necessary packages and added our variables, now let’s write the playbook.
Example
- We create the file example_vars.yaml, where we define the image, username, password, and project_name variables, as well as two lists, one containing the names of our disks and the other virtual machines. (image — the OS image our virtual machine will operate on; flavor — the machine configuration, in our case it’s 512 MB RAM and 1 vCPU; see here for more information):
---
username: TestUser
password: 123456
project_name: TestProject
image: Ubuntu 16.04 LTS 32-bit
volumes:
  - display_name: volume1
  - display_name: volume2
  - display_name: volume3
servers:
  - name: vm1
  - name: vm2
  - name: vm3
- We create the file example.yaml, where we’ll describe our tasks. We add the required hosts and vars_files parameters.
The hosts variable defines the machine(s) we’ll run our tasks from, and vars_files shows where our variables should be loaded from (here it’s example_vars.yaml):
---
- hosts: localhost
  vars_files:
    - example_vars.yaml
- Now we write our tasks. First we create our project using selvpc_projects and set the project’s quotas with the selvpc_quotas module. For 3 machines, 3 vCPUs, 1536 MB RAM, and 15 GB SSD should be enough:
...
tasks:
   - name: Create project
     selvpc_projects:
         project_name: "{{ project_name }}"
     register: project_out

   - name: Set quotas on created project
     selvpc_quotas:
         project_id: "{{ project_out.project.id }}"
         quotas:
             compute_cores:
             - region: ru-1
               zone: ru-1a
               value: 3
             compute_ram:
             - region: ru-1
               zone: ru-1a
               value: 1536
             volume_gigabytes_fast:
             - region: ru-1
               zone: ru-1a
               value: 15
     register: quotas_out
- We create and add a user to the project:
tasks:
   ...
     - name: Create user
       selvpc_users:
           username: "{{ username }}"
           password: "{{ password }}"
       register: user_out

     - name: Add created user to project
       selvpc_roles:
           project_id: "{{ project_out.project.id }}"
           user_id: "{{ user_out.user.id }}"
- We create a network:
tasks:
    ...
     - name: Create public net
       selvpc_subnets:
            project_id: "{{ project_out.project.id }}"
            subnets:
              - region: ru-1
                type: ipv4
                quantity: 1
                prefix_length: 29
       register: public_net

     - name: Get info about network
       selvpc_subnets:
            subnet_id: "{{ public_net|json_query(subnets[0].id') }}"
       register: network_out
- After we’ve made a network for our virtual machines, we’ll needs disks. We can make those from the Ansible module os_volume:
tasks:
   ...
     - name: Create volumes
       os_volume:
          state: present
          auth:
 auth_url: https://api.selvpc.ru/identity/v3
            username: "{{ username }}"
            password: "{{ password }}"
            project_name: "{{ project_name }}"
          display_name: "{{ item.display_name }}"
          image: "{{ image }}"
          size: 5
         region_name: ru-1
       with_items: "{{ volumes }}"
       register: volume
- Next we’ll need SSH keys to access our machines. We can make one common key for all of them. Here we’ll use os_keypair:
tasks:
   ...
     - name: Create key
       os_keypair:
          state: present
          auth:
         auth_url: https://api.selvpc.ru/identity/v3
            username: "{{ username }}"
            password: "{{ password }}"
            project_name: "{{ project_name }}"
          name: ansible_key
         region_name: ru-1
          public_key_file: "{{ '~' | expanduser }}/.ssh/id_rsa.pub"
       register: key
- With os_nova_flavor, we create the configuration (flavor) for our machines. In our case, it’s 512 MB RAM and 1 vCPU. We’ll call it “selectel_test_flavor”, but you can name it whatever you want:
tasks:
   ...
     - name: Create flavor
       os_nova_flavor:
          state: present
          auth:
            auth_url: https://api.selvpc.ru/identity/v3
            username: "{{ username }}"
            password: "{{ password }}"
            project_name: "{{ project_name }}"
          name: selectel_test_flavor
          ram: 512
          vcpus: 1
          disk: 0
          region_name: ru-1
          is_public: False
       register: flavor
- We’ll describe the task to actually create the servers as well as a task to add them to the in-memory inventory so they can interact with already existing hosts. Then we add a small pause at the end so that the virtual machine has time to boot up:
tasks:
   ...
     - name: Create servers
       os_server:
          state: present
          auth:
         auth_url: https://api.selvpc.ru/identity/v3
            username: "{{ username }}"
            password: "{{ password }}"
            project_name: "{{ project_name }}"
          name: "{{ item.1.name }}"
          flavor: "{{ flavor }}"
          boot_volume: "{{ item.0 }}"
          nics: "net-id={{ network_out.subnet.network_id }}"
          key_name: ansible_key
         region_name: ru-1
       with_together:
          - "{{ volume|json_query('results[*].id') }}"
          - "{{ servers }}"
       register: created_servers


     - name: Add hosts to inventory
       add_host:
          name: "{{ item }}"
          ansible_host: "{{ item }}"
          ansible_ssh_user: root
          groups: just_created
       with_items: "{{ created_servers|json_query('results[*].openstack.accessIPv4') }}"

- pause:
     seconds: 60
- At the end, we add a task to check our host’s availability:
tasks:
   ...
- hosts: just_created
  tasks:
    - name: Ping all instances
      ping:
      register: results
 debug: msg={{ results }}
I also added debug and ignore_errors to the task for clarity; it’s by no means necessary (debug lets us print out more detailed results from running our tasks, and ignore_errors doesn’t stop the playbook if an error occurs).
At the end of the playbook, I also added a task to delete the configuration (flavor), user, and project in order to clear everything we already created:
- hosts: localhost
  gather_facts: False
  vars_files:
    - example_vars.yaml
  tasks:
    - name: Delete flavor
      os_nova_flavor:
          state: absent
          auth:
            auth_url: https://api.selvpc.ru/identity/v3
            username: "{{ username }}"
            password: "{{ password }}"
            project_name: "{{ project_name }}"
          name: "{{ flavor.flavor.name }}"
          region_name: ru-1
      register: out

     - name: Delete user
       selvpc_users:
           user_id: "{{ user_out.user.id }}"
           state: absent
       register: out

     - name: Delete project
       selvpc_projects:
           project_id: "{{ project_out.project.id }}"
           state: absent
       register: out
The full playbook file can be found here.
- We launch our playbook:
$ ansible-playbook example.yaml
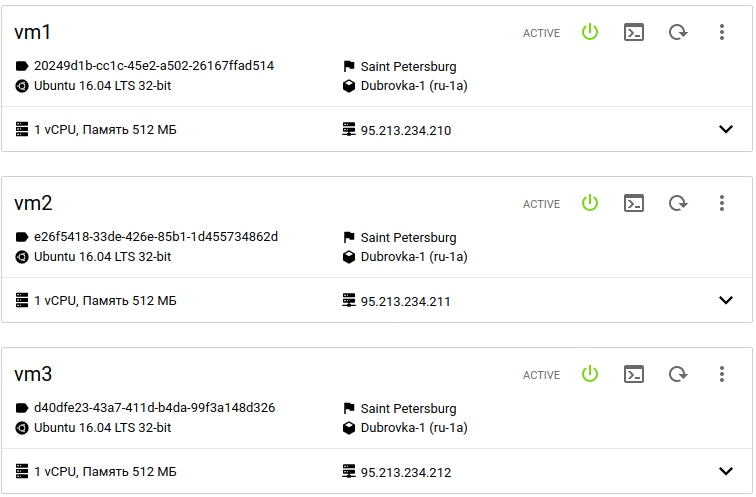
During the pause from point 9, we can go to the project control panel and view our newly created servers:
Our playbook results are printed in the console:
TASK [Ping all instances]
*************************************************************************
ok: [95.213.234.211]
ok: [95.213.234.212]
ok: [95.213.234.210]

TASK [debug]
*************************************************************************
ok: [95.213.234.210] => {
    "msg": {
        "changed": false,
        "ping": "pong"
    }
}
ok: [95.213.234.211] => {
    "msg": {
        "changed": false,
        "ping": "pong"
    }
}
ok: [95.213.234.212] => {
    "msg": {
        "changed": false,
        "ping": "pong"
    }
}

PLAY [localhost]
*************************************************************************
TASK [Delete flavor]
*************************************************************************
changed: [localhost]

TASK [Delete user]
*************************************************************************
changed: [localhost]

TASK [Delete project]
*************************************************************************
changed: [localhost]

PLAY RECAP
*************************************************************************
95.213.234.210          : ok=3    changed=0    unreachable=0    failed=0
95.213.234.211          : ok=3    changed=0    unreachable=0    failed=0
95.213.234.212          : ok=3    changed=0    unreachable=0    failed=0
localhost                     : ok=25   changed=13   unreachable=0    failed=0
In the printout we see that all of our tasks were a success and our hosts are available. We can also see that the user and project we created were deleted along with the virtual machines.
Conclusion
Today we looked at our ansible-selvpc-modules package for managing VPC projects.
These modules can be used to perform all of the tasks available in the VPC GUI. This should come in handy for anyone who manages the VPC from our API.
Anyone interested is welcome to try out these modules. We’d appreciate it if you would also share any comments you may have below.