Virtual Private Cloud: CoreOS and RancherOS

We recently updated the version of CoreOS available in our Virtual Private Cloud and also added RancherOS to our list of available images.
These operating systems are useful for managing a large number of applications in containers and for using different container clustering systems, like Kubernetes, Docker Swarm, Apache Mesos, etc.
CoreOS and RancherOS are different from most Linux distributions in that they contain minimal software for launching applications in containers; additionally, these operating systems don’t have a package manager or interpreter for various programming languages (Python, Ruby, etc.).
Below, we’ll look at at the specifics for CoreOS and RancherOS, as well as how to configure the etcd and fleet services. We will also configure a Docker Swarm cluster in RancherOS.
CoreOS
CoreOS was developed specifically for quickly deploying a large number of user applications in isolated containers.
CoreOS contains preinstalled tools for managing multiple nodes and containers in a cluster:
- etcd — distributed data storage which nodes use to receive information about available services in clusters, configurations, and temporary files;
- Docker — the main platform for delivering and launching applications in a container;
- Rocket — an alternative to Docker, developed by the creators of CoreOS;
- fleet — a distributed initialization system that lets you manage multiple instances of systemd on the independent nodes of a cluster and launch services on the nodes with the smallest loads.
Configuration
The basic way to change system parameters is by describing the necessary configuration in YAML in the cloud-config.yml configuration file. This file is used by Cloud-init to configure the system.
Please note that CoreOS uses its own version of Cloud-init. In this version, configuration files are only somewhat compatible with the more popular Launchpad-cloud-init, which is used by most distributions for configuring systems in various cloud services, including the Virtual Private Cloud.
Let’s look at an example of cloud-config.yml:
#cloud-config

# Set hostname
hostname: "node01"

# Set ntp servers
write_files:
    - path: /etc/systemd/timesyncd.conf
      content: |
        [Time]
        NTP=0.ru.pool.ntp.org 1.ru.pool.ntp.org

coreos:
    units:
    # Configure static network on eth0 interface
    - name: iface-eth0.network
      runtime: true
      content: |
        [Match]
        Name=eth0

        [Network]
        DNS=188.93.16.19
        DNS=188.93.17.19
        DNS=109.234.159.91
        Address=10.11.12.13/24
        Gateway=10.11.12.1

    # Change standard SSH port
    - name: sshd.socket
      command: restart
      runtime: true
      content: |
        [Socket]
        ListenStream=2345
        FreeBind=true
        Accept=yes
Using the given parameters, Clouid-init will change the hostname and standard port for the SSH service, configure a static network on interface eth0 and add ntp servers for time synchronization.
More detailed information on the cloud-config.yml structure can be found in the official documentation.
When you create a server in the Virtual Private Cloud from a prepared CoreOS image, you don’t have to perform the basic system setup. We’ve already made the necessary changes to the image, so your server, including the network interface, will be set up automatically.
SSH access to a server running CoreOS will initially be possible only with the key given when the server is created. This key will be added for the user core.
In addition to its own version of cloud-init, the creators of CoreOS developed the utility Ignition. This tool mimics cloud-init and also lets you perform low-level system configurations, like changing disk partition tables and formatting file systems. This is possible because Ignition initiates during the early stages of the system start up, while initramfs loads.
Ignition configuration files are written in JSON format.
Below is an example of a file that Ignition uses to format the root partition in Btrfs and then configure the system with the same parameters as the Cloud-init example above:
{
    "ignition": { "version": "2.0.0" },
    "storage": {
        "filesystems": [{
            "mount": {
                "device": "/dev/disk/by-label/ROOT",
                "format": "btrfs",
                "create": {
                    "force": true,
                    "options": [ "--label=ROOT" ]
                }
            }
        }],
        "files": [{
            "filesystem": "root",
            "path": "/etc/systemd/timesyncd.conf",
            "mode": 420,
            "contents": { "source": "data:,%5BTime%5D%0ANTP=0.ru.pool.ntp.org%201.ru.pool.ntp.org%0A" }
            },
            {
            "filesystem": "root",
            "path": "/etc/hostname",
            "mode": 420,
            "contents": { "source": "data:,node01" }
            }
        ]
    },
    "networkd": {
        "units": [{
            "name": "iface-eth0.network",
            "contents": "[Match]\nName=eth0\n\n[Network]\nDNS=188.93.16.19\nDNS=188.93.17.19\nDNS=109.234.159.91\nAddress=10.11.12.13/24\nGateway=10.11.12.1"
        }]
    },
    "systemd": {
        "units": [{
            "name": "sshd.socket",
            "command": "restart",
            "runtime": true,
            "contents": "[Socket]\nListenStream=2345\nFreeBind=true\nAccept=yes"
        }]
    }
}
More detailed information on all of Ingition’s abilities can be found in the official documentation.
CoreOS Cluster Configuration
In this example, we’ll first have to create three CoreOS servers with the following parameters in the VPC control panel:
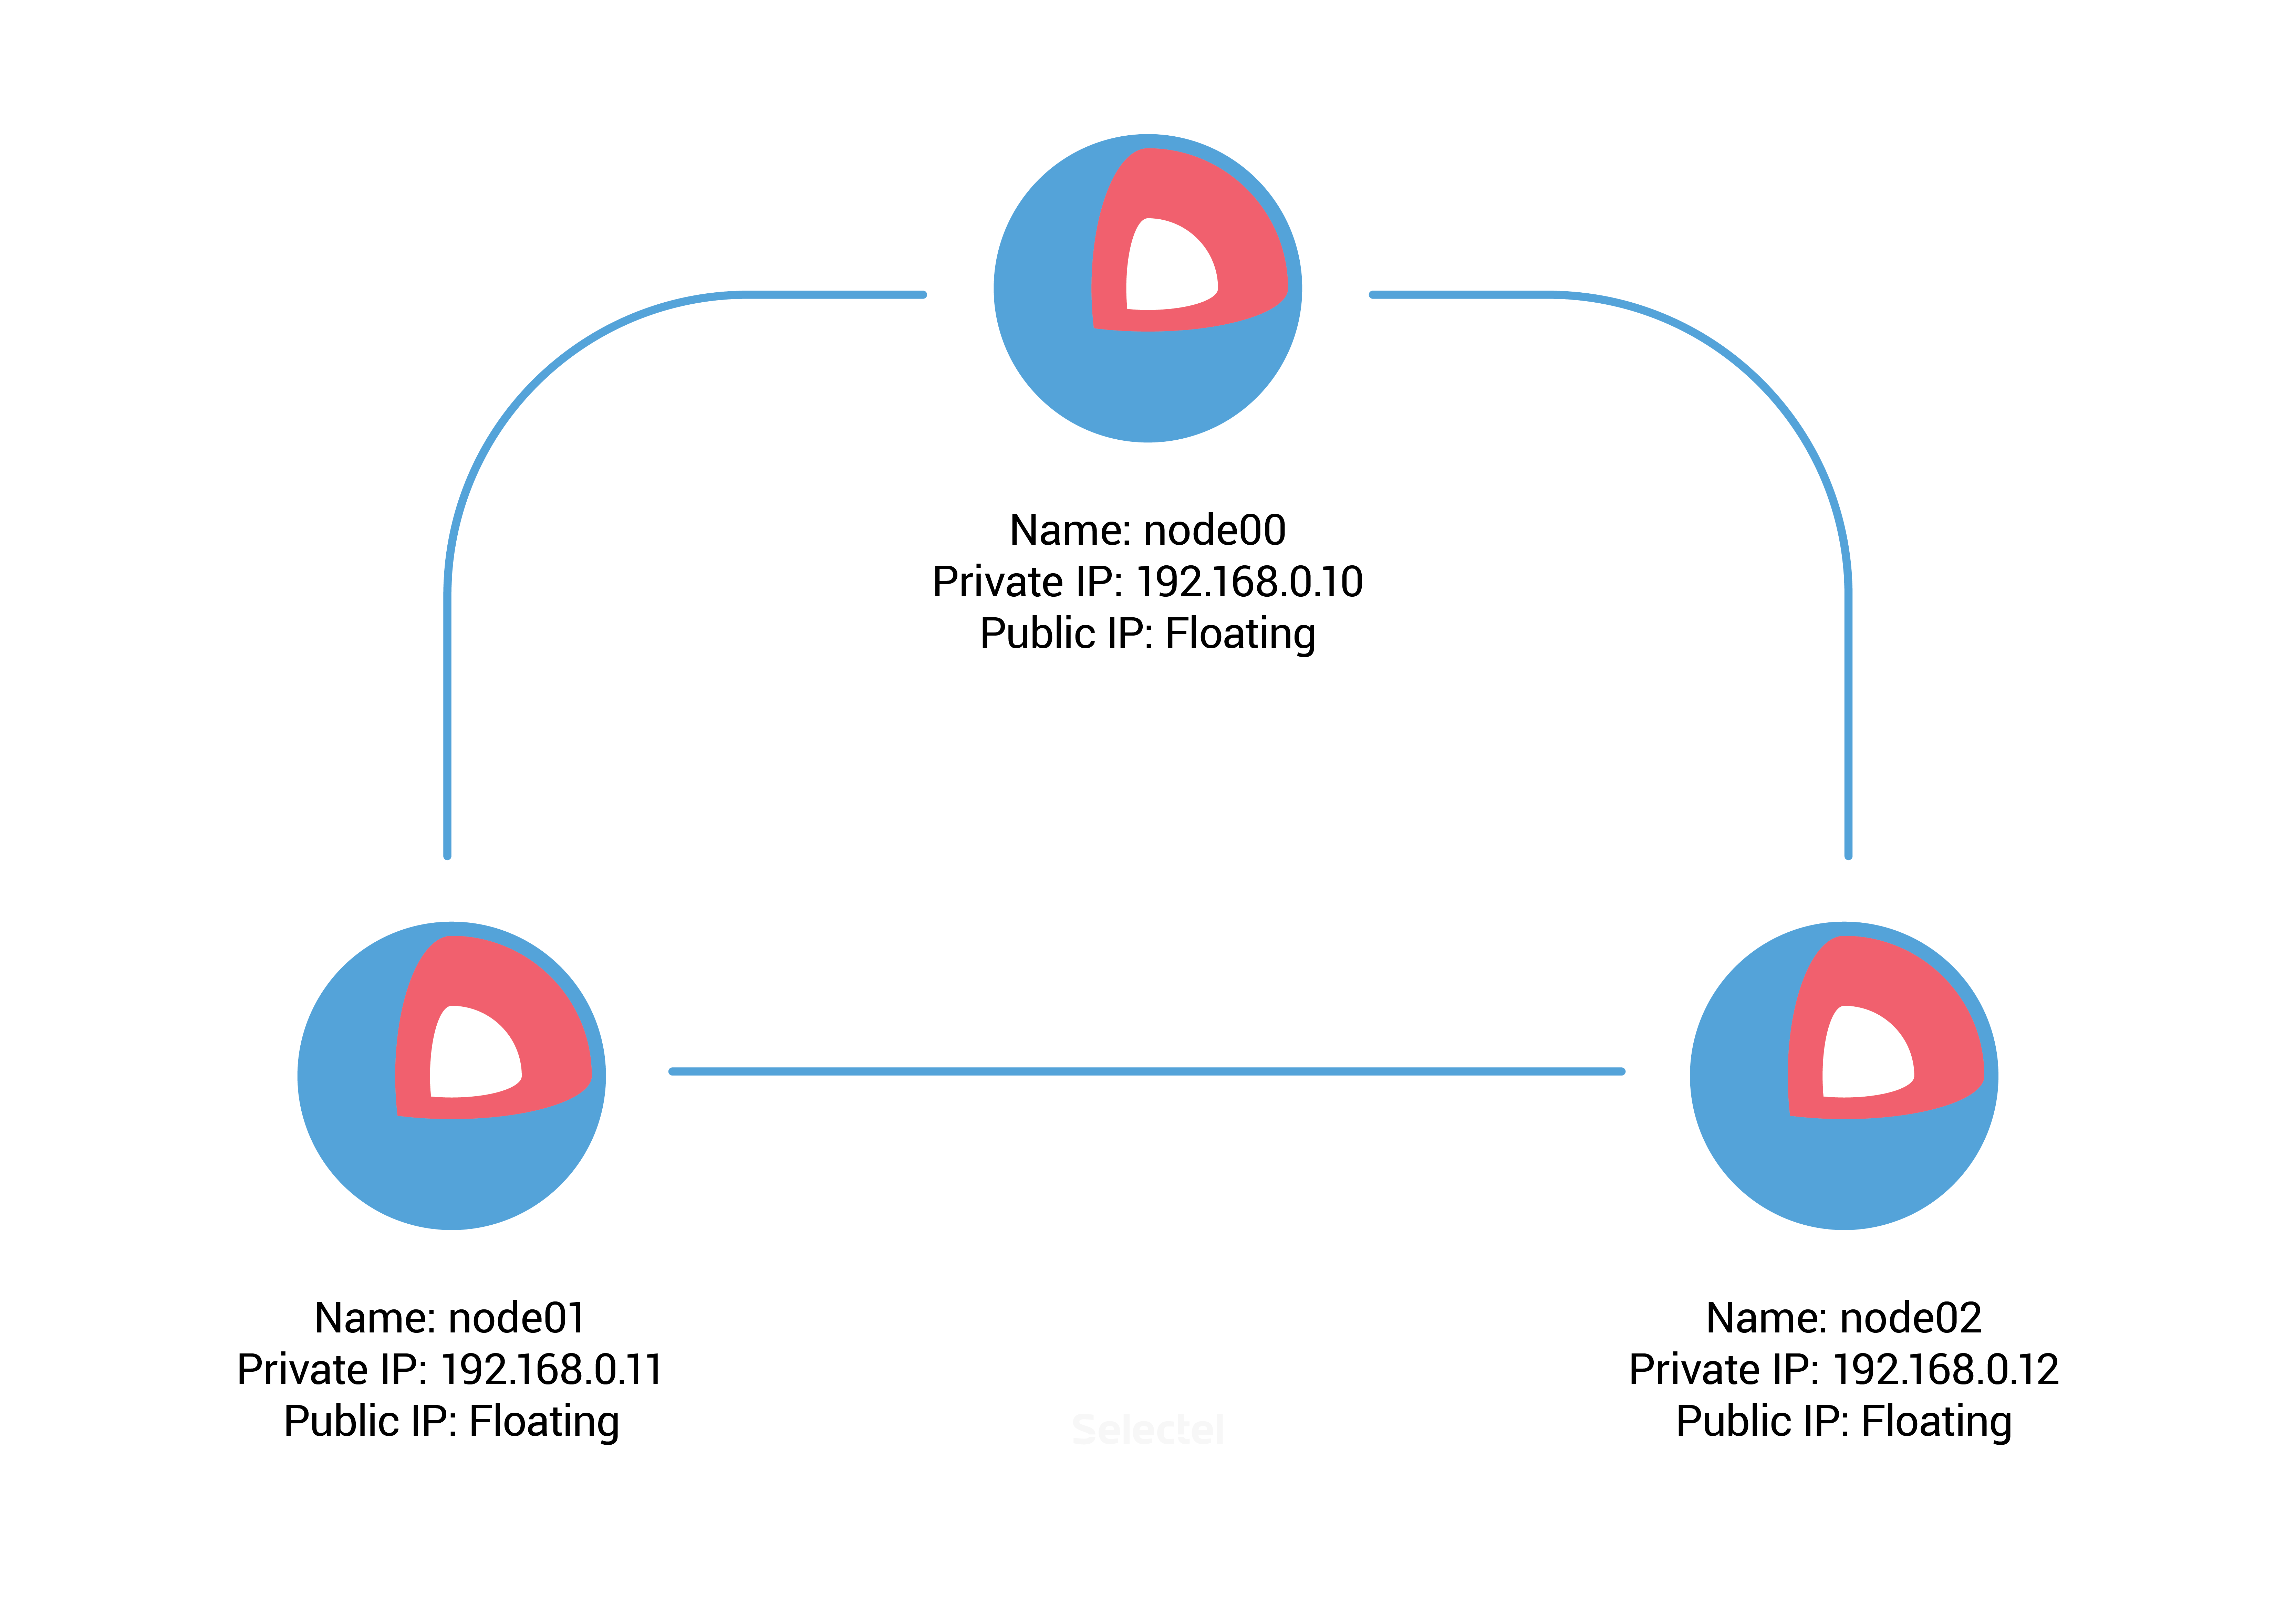
Once our servers have been created, we need discovery-url for the etcd service. To do this, we can use the free public service discovery.etcd.io. We’ll run the following command on the host, node00:
core@node00 ~ $ curl -w "\n" 'https://discovery.etcd.io/new?size=3'
https://discovery.etcd.io/ec42cfef0450bd8a99090ee3d3294493
We add this URL and additional etcd parameters to the file /usr/share/oem/cloud-config.yml on the next server.
coreos:
    etcd2:
        discovery: https://discovery.etcd.io/ec42cfef0450bd8a99090ee3d3294493
        advertise-client-urls: http://192.168.0.10:2379,http://192.168.0.10:4001
        initial-advertise-peer-urls: http://192.168.0.10:2380
        listen-client-urls: http://0.0.0.0:2379,http://0.0.0.0:4001
        listen-peer-urls: http://192.168.0.10:2380

    units:
        - name: etcd2.service
          command: start

        - name: fleet.service
          command: start
The parameters in the etcd2 section are the URL addresses in protocol://address:port format, which are needed for announcing nodes and exchanging data with other cluster members.
The units section lets you manage systemd units in the system; in our case, it launches the units etc2d.service and fleet.service.
For servers node01 and node02, you’ll need to make similar changes to cloud-config.yml: change the IP address from 192.168.0.10 to 192.168.0.11 on node01 and 192.168.0.12 on node02.
After the new settings have been added, we launch Cloud-init on all three servers (or we can just reboot these servers):
core@node00 ~ $ sudo coreos-cloudinit --from-file /usr/share/oem/cloud-config.yml
We also check the status of etcd:
core@node00 ~ $ etcdctl cluster-health
member 3aaf91fd1172594e is healthy: got healthy result from http://192.168.0.11:2379
member 8cf40790248e1dcd is healthy: got healthy result from http://192.168.0.12:2379
member 96b61f40c082cd0b is healthy: got healthy result from http://192.168.0.10:2379
cluster is healthy
We check distributed storage availability, add a new directory (or “key” in etcd terminology) with the values from node00:
core@node00 ~ $ etcdctl set /common/cluster-name selectel-test-cluster
selectel-test-cluster
Then we make sure that our new key is accessible from other nodes in the cluster.
core@node01 ~ $ etcdctl get common/cluster-name
selectel-test-cluster
Excellent! Etcd is working and we can start using fleet.
In our example, we’ll use fleet to launch Nginx in an isolated Docker container. To start with, we create systemd unit /etc/systemd/system/nginx.service:
[Unit]
Description=Nginx Test Service

[Service]
EnvironmentFile=/etc/environment
ExecStartPre=/usr/bin/docker pull nginx
ExecStart=/usr/bin/docker run --rm --name nginx -p 80:80 nginx
ExecStop=/usr/bin/docker kill nginx

[X-Fleet]
Conflicts=nginx.service
The Conflicts parameter in the X-Fleet section prevents two or more Nginx services from being launched on one node, which lets you “spread” the load over the cluster and increase service availability. Additional X-Fleet parameters, which can be used inside systemd units, are described in the fleet documentation.
The other sections in the file are standard for systemd; you can find some information on them in the instructions from CoreOS.
We use fleetctl to launch a new nginx.service unit:
core@node00 ~ $ fleetctl start /etc/systemd/system/nginx.service
Unit nginx.service inactive
Unit nginx.service launched on 1ad018e0.../192.168.0.11
Afterwards, we can find Nginx instances on any cluster node from the units list.
core@node02 ~ $ fleetctl list-units
UNIT            MACHINE                     ACTIVE  SUB
nginx.service   1ad018e0.../192.168.0.11    active  running
core@node02 ~ $ fleetctl list-unit-files
UNIT            HASH    DSTATE      STATE       TARGET
nginx.service   0c112c1 launched    launched    1ad018e0.../192.168.0.11
We can see that a container with Nignix was launched on the server with IP address 192.168.0.11, which relates to node01.
If we then disable or delete server node01, fleet will automatically move Nginx to another available node.
In this case, etcd announces the member is unavailable when it checks the cluster status.
core@node00 ~ $ etcdctl cluster-health
failed to check the health of member 3aaf91fd1172594e on http://192.168.0.11:2379: Get http://192.168.0.11:2379/health: dial tcp 192.168.0.11:2379: i/o timeout
failed to check the health of member 3aaf91fd1172594e on http://192.168.0.11:4001: Get http://192.168.0.11:4001/health: dial tcp 192.168.0.11:4001: i/o timeout
member 3aaf91fd1172594e is unreachable: [http://192.168.0.11:2379 http://192.168.0.11:4001] are all unreachable
member 8cf40790248e1dcd is healthy: got healthy result from http://192.168.0.12:2379
member 96b61f40c082cd0b is healthy: got healthy result from http://192.168.0.10:2379
cluster is healthy
We can see that Nginx’s status is fine; it was launched on another working node:
core@node00 ~ $ fleetctl list-units
UNIT            MACHINE                     ACTIVE  SUB
nginx.service   4a1ff11c.../192.168.0.10    active  running
This was a basic example of a etcd + Docker + fleet cluster configuration running on CoreOS. In the next section, we’ll look at another distribution: RancherOS. This is based on CoreOS and was also designed for actively using containers.
RancherOS
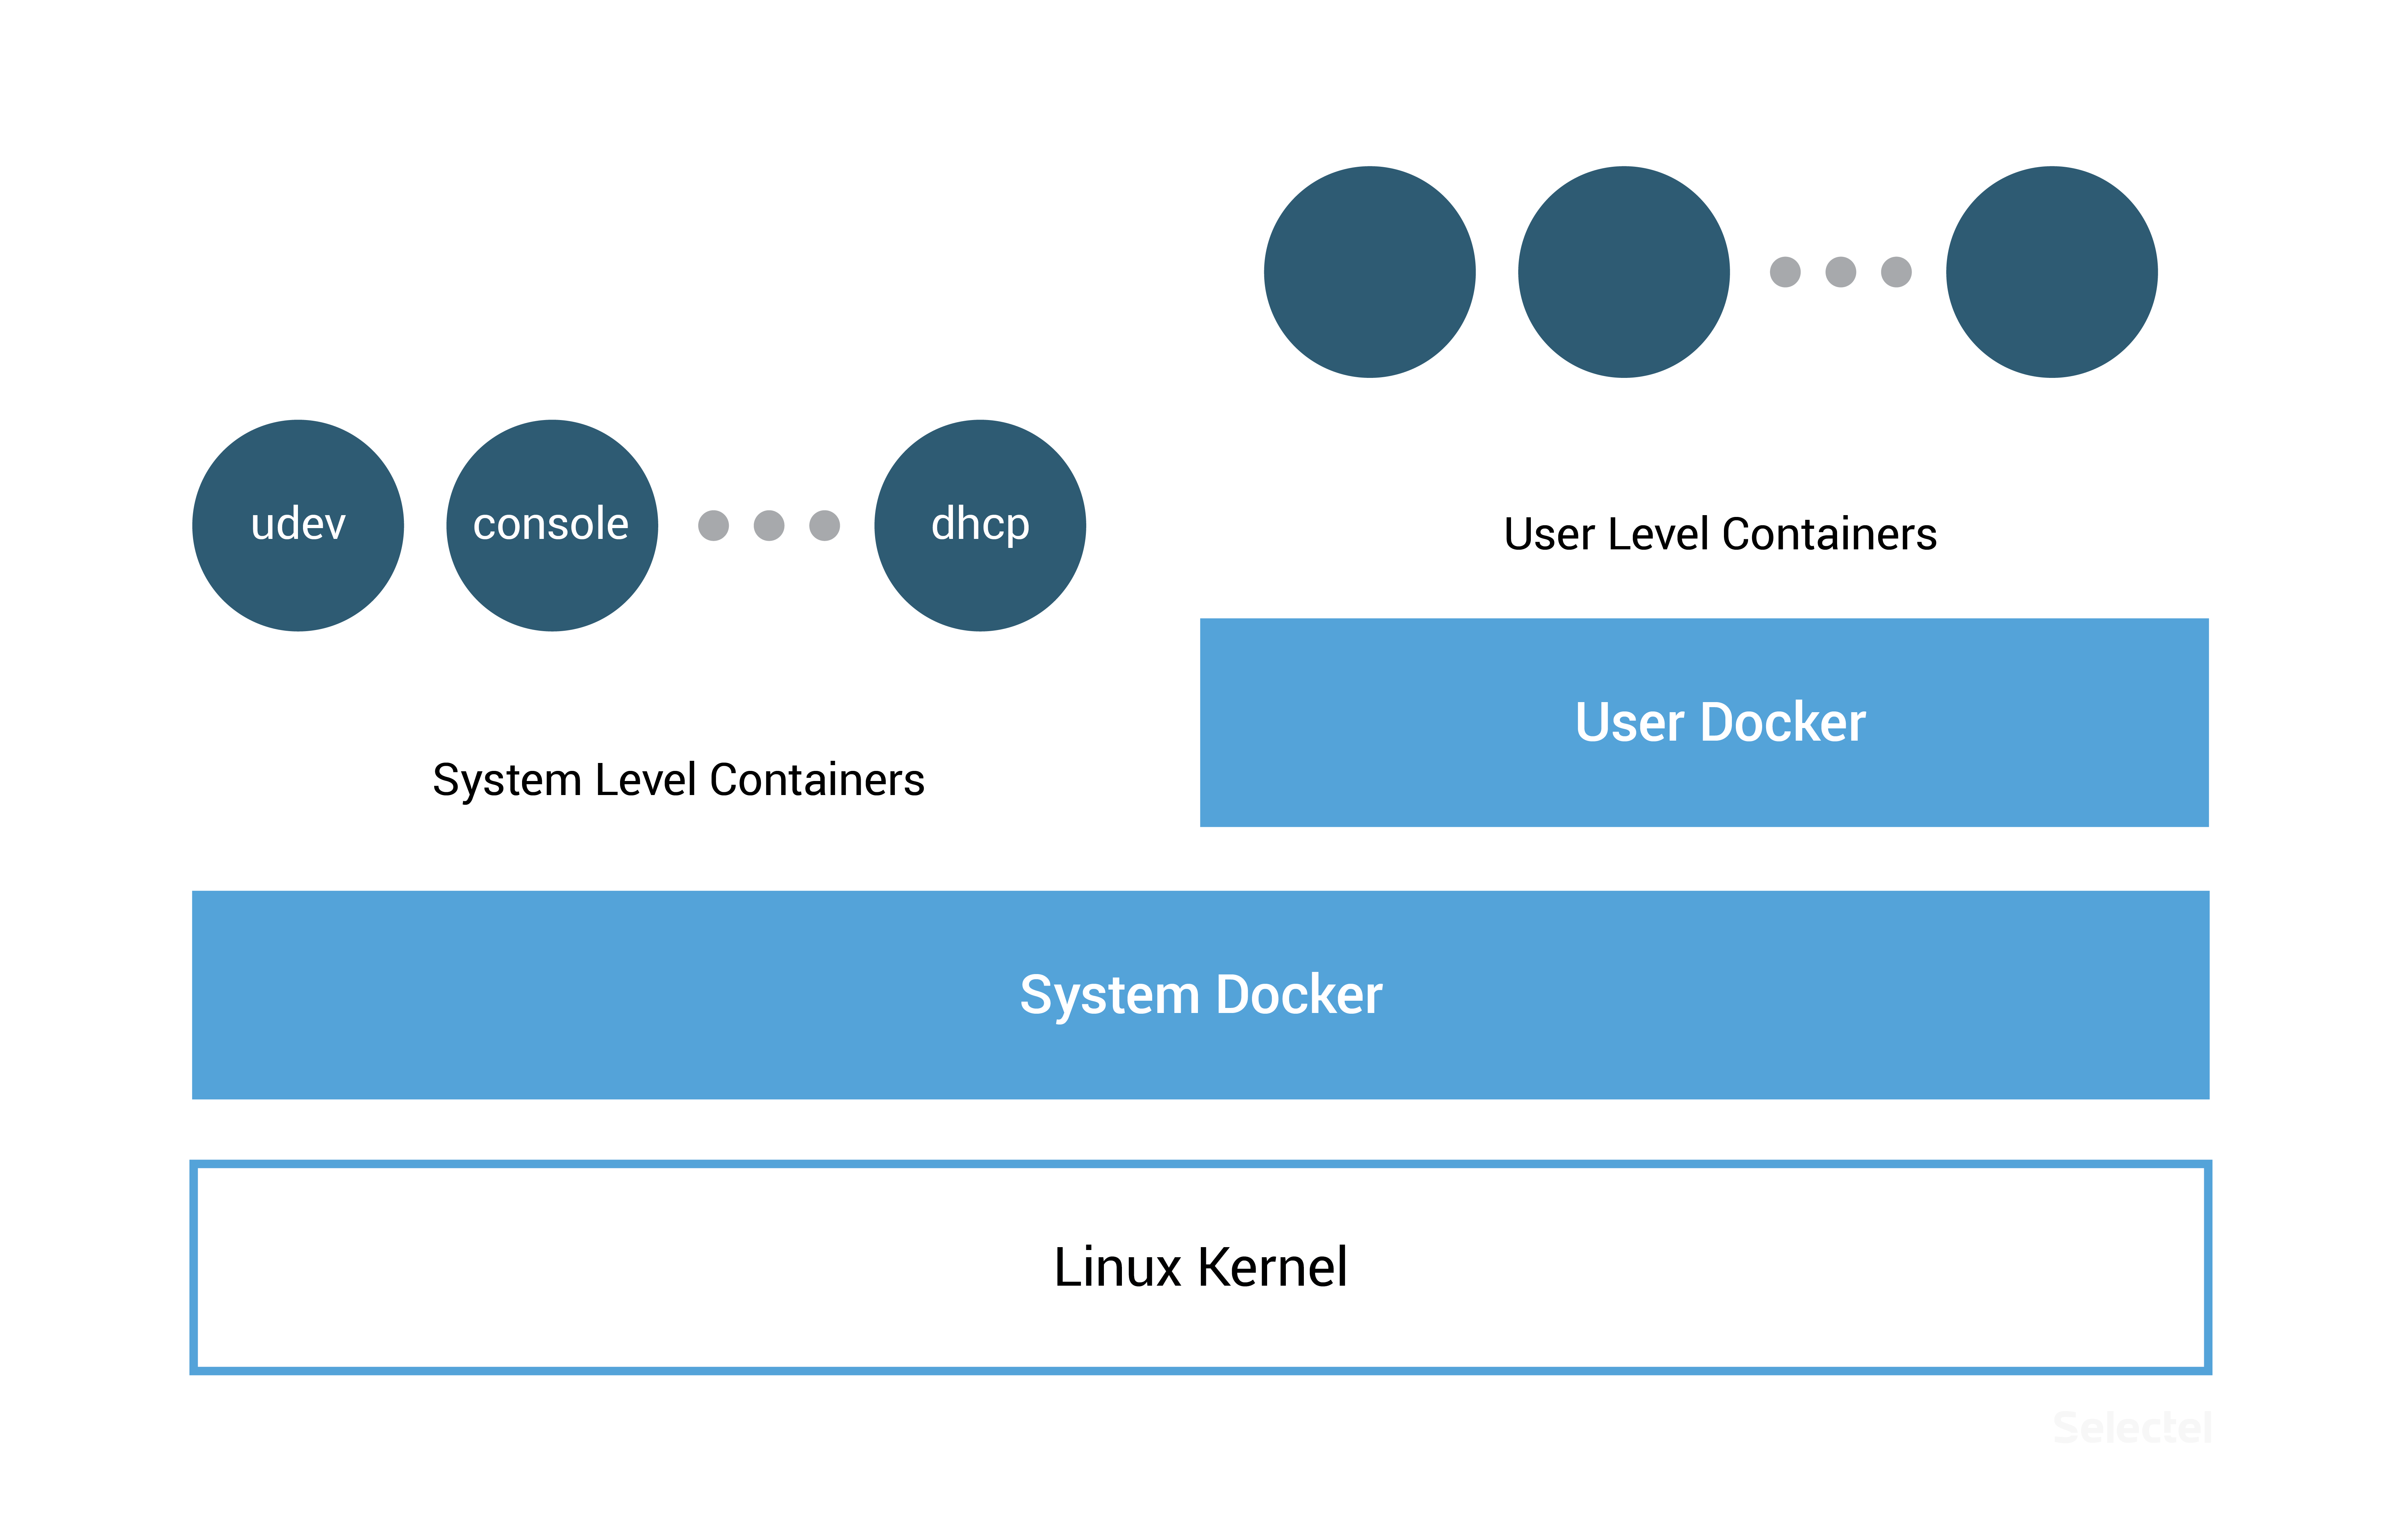
RancherOS is unique in that it launches not only user applications in containers, but entire system services. Moreover, the RacherOS Docker has a PID = 1, which is why it launches right after the system kernel.
The operating system contains two Docker instances, one of which is System Docker. This is where containers of udev, acpid, syslog, ntp, and other system-critical services are launched. The System Docker instance replaces traditional system instances (systemd, Upstart, SysV) that are present in standard Linux distributions.
The second Docker instance is used for launching user applications and is itself a special container launched in System Docker.
This segregation protects system containers from potentailly hazardous user actions.
Since RancherOS uses the standard Docker environment, we can use the standard Docker commands to manage user and system containers.
# check Docker version
[rancher@rancher-os ~]$ docker --version
Docker version 1.12.1, build 23cf638
# install a new container from Docker Hub
[rancher@rancher-os ~]$ docker run -d nginx
Unable to find image 'nginx:latest' locally
latest: Pulling from library/nginx
…

Status: Downloaded newer image for nginx:latest
# view a list of launched containers
[rancher@rancher-os ~]$ docker ps
CONTAINER ID        IMAGE               COMMAND                  CREATED              STATUS              PORTS               NAMES
2ec5126e8dd5        nginx               "nginx -g 'daemon off"   About a minute ago   Up About a minute   80/tcp, 443/tcp     sad_fermat
To access system containers, we have to use the system-docker command with sudo.
We can view a list of the main OS services that have been launched with the command:
[rancher@rancher-os ~]$ sudo system-docker ps
CONTAINER ID        IMAGE                       COMMAND                  CREATED             STATUS              PORTS               NAMES
a566d0c7cc4c        rancher/os-docker:1.12.1    "/usr/bin/user-docker"   8 minutes ago       Up 8 minutes                            docker
8697a04e90a4        rancher/os-console:v0.6.1   "/usr/bin/ros entrypo"   8 minutes ago       Up 8 minutes                            console
c8c337282aaa        rancher/os-base:v0.6.1      "/usr/bin/ros entrypo"   8 minutes ago       Up 8 minutes                            network
1e55244fc99c        rancher/os-base:v0.6.1      "/usr/bin/ros entrypo"   8 minutes ago       Up 8 minutes                            ntp
fd6a03fdb28f        rancher/os-udev:v0.6.1      "/usr/bin/ros entrypo"   8 minutes ago       Up 8 minutes                            udev
7e9e50c28651        rancher/os-acpid:v0.6.1     "/usr/bin/ros entrypo"   8 minutes ago       Up 8 minutes                            acpid
5fec48b060f2        rancher/os-syslog:v0.6.1    "/usr/bin/ros entrypo"   8 minutes ago       Up 8 minutes                            syslog
To restart the system container, we run:
[rancher@rancher-os ~]$ sudo system-docker restart ntp
Configuration
The primary tool for automatically configuring this system is its own implementation of cloud-init, which is split into two utilities: cloud-init-execute and cloud-init-save. Compared to other versions of cloud-init, the RancherOS version uses the declarative language YAML; however, cloud-config.yml for other distributions will not be compatible with RancherOS.
All of the configuration file’s possible directives are given in the official documentation.
System services use the parameters from files in the following order (each subsequent file from the list overwrites overlapping parameters from previous files):
- /usr/share/ros/os-config.yml — default system settings;
- /usr/share/ros/oem/oem-config.yml — in our case, this is the file that lets us automatically configure static networks to the parameters from the VPC control panel;
- YAML files in the directory /var/lib/rancher/conf/cloud-config.d/;
- /var/lib/rancher/conf/cloud-config.yml — the file that stores values set by the ros utility, which we’ll talk about later on;
- kernel parameters starting with the keyword “rancher”;
- /var/lib/rancher/conf/metadata — metadata from useable cloud services added by the cloud-init-save utility.
You can change system settings with the ros utility. New parameters will be shown in the file /var/lib/rancher/conf/cloud-config.yaml:
[rancher@rancher-os ~]$ sudo ros config set rancher.network.dns.nameservers "['188.93.16.19','188.93.17.19', '109.234.159.91']"
[rancher@rancher-os ~]$ sudo cat /var/lib/rancher/conf/cloud-config.yml
rancher:
    network:
        dns:
            nameservers:
              - 188.93.16.19
              - 188.93.17.19
              - 109.234.159.91
In addition to changing the settings of system services, the ros utility is also used for managing OS versions, Docker versions, and configuring TLS and SELinux.
When you create a server in the Virtual Private Cloud from a prepared RancherOS image, you do not have to perform the basic system setup (configure network interfaces, etc.).
When the installation is complete, the server will be accessible via the IP address you choose in the VPC control panel. You will be able to connect to the server over SSH, but authentication will initially only be possible with the key given when you create your server. This key will be added to the user rancher.
Managing Versions
You can find the current version of your operating system by running the command:
[rancher@rancher-os ~]$ sudo ros os version
v0.6.1
To view all available releases:
[rancher@rancher-os ~]$ sudo ros os list
rancher/os:v0.4.0 remote
rancher/os:v0.4.1 remote
rancher/os:v0.4.2 remote
rancher/os:v0.4.3 remote
rancher/os:v0.4.4 remote
rancher/os:v0.4.5 remote
rancher/os:v0.5.0 remote
rancher/os:v0.6.0 remote
rancher/os:v0.6.1 remote
You can install the latest stable version by running the command ros os upgrade or by selecting a version with the -i parameter:
[rancher@rancher-os ~]$ sudo ros os upgrade -i rancher/os:v0.5.0
Since we’ve chosen version 0.5.0, which is older than our current version 0.6.1, the system will downgrade instead of upgrade.
It’s just as easy to manage our version of Docker. Let’s look at several examples:
#to vew available versions
[rancher@rancher-os ~]$ sudo ros engine list
disabled docker-1.10.3
disabled docker-1.11.2
current  docker-1.12.1
#to install version 1.11.2
[rancher@rancher-os ~]$ sudo ros engine switch docker-1.11.2
INFO[0000] Project [os]: Starting project
INFO[0000] [0/19] [docker]: Starting
…
INFO[0010] Recreating docker
INFO[0010] [1/19] [docker]: Started
Docker Swarm Clusters on RancherOS
Integrated tools for managing Docker Swarm container clusters have been included in Docker 1.12. This makes configuring prepared clusters much easier.
In our example, we’ll use the RancherOS image available in the Virtual Private Cloud, which uses Docker ver. 1.12.1.
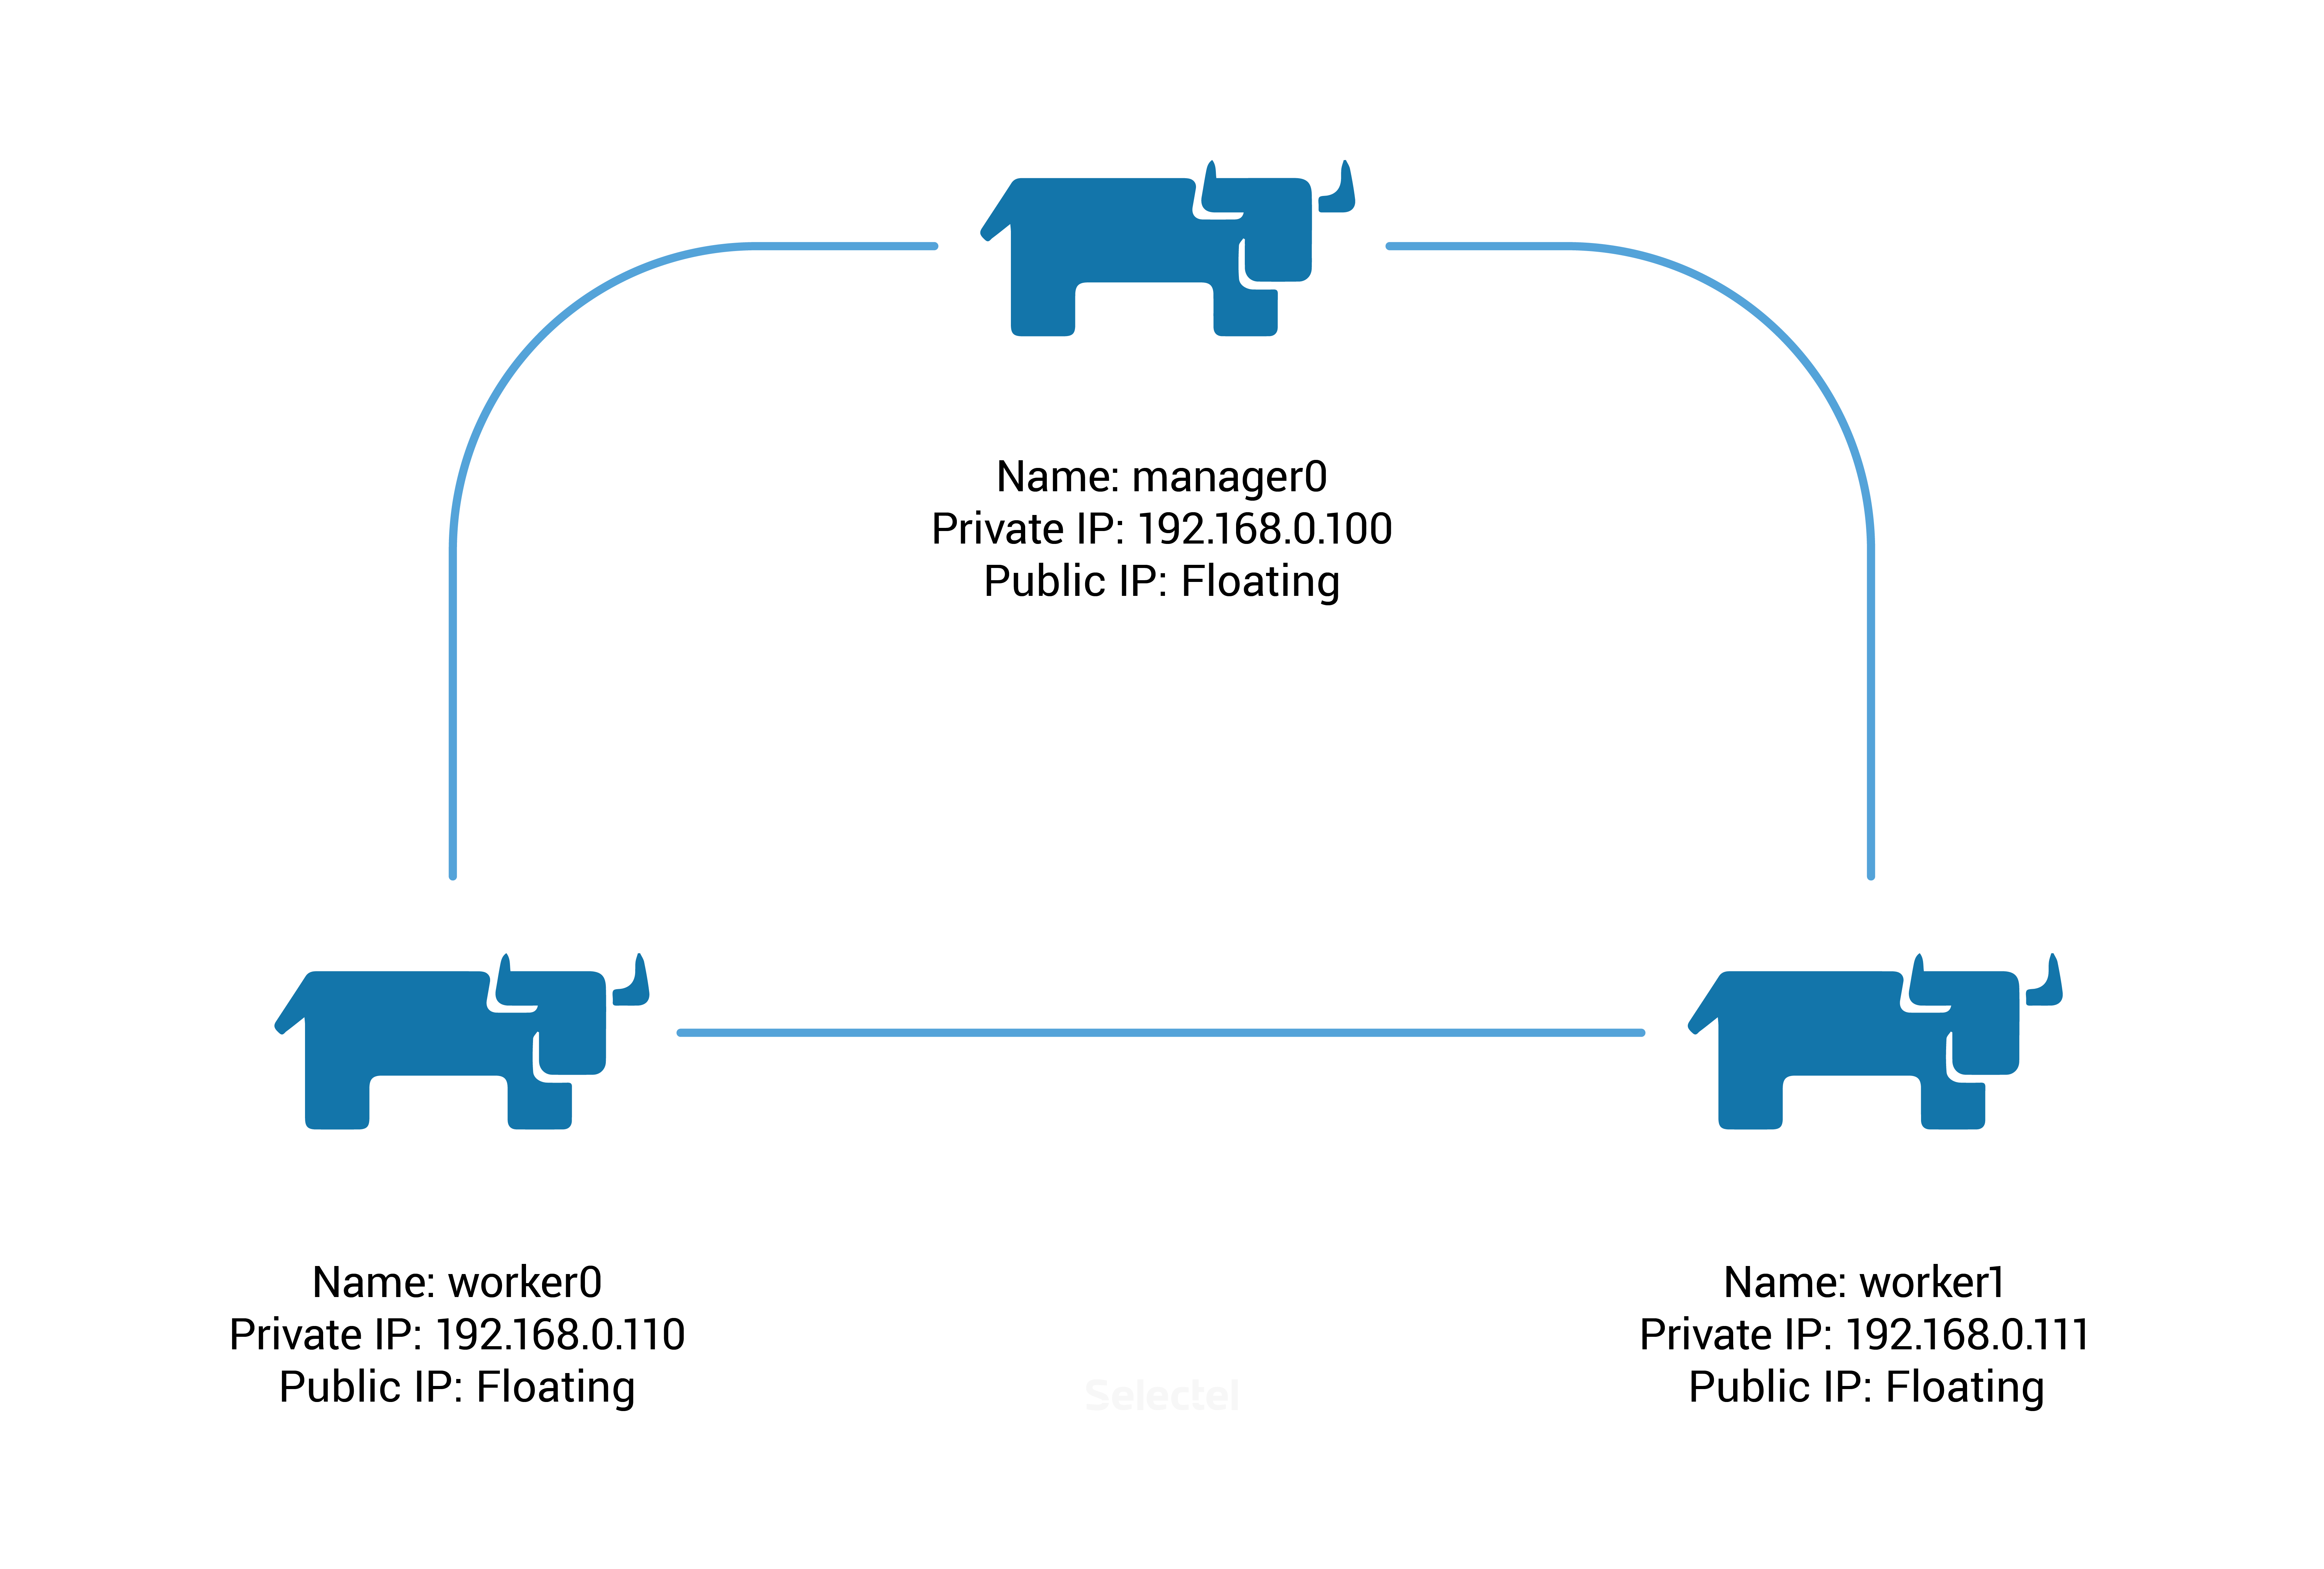
We’ll have to create three servers with the following parameters:
We’ll start by making our Docker Swarm cluster. We do this by running the following command on node manager0:
[rancher@manager0 ~]$ docker swarm init --advertise-addr 192.168.0.100
Swarm initialized: current node (8gf95qb6l61v5s6561qx5vfy6) is now a manager.

To add a worker to this swarm, run the following command:

    docker swarm join \
        --token SWMTKN-1-0hlhela57gsvxzoaqol70n2b9wos6qlu3ukriry3pcxyb9j2k6-0n1if4hkvdvmrpbb7f3clx1yg \
        192.168.0.100:2377

To add a manager to this swarm, run 'docker swarm join-token manager' and follow the instructions.
As you can see from the prompt, the following command will have to be run on nodes worker0 and worker1:
docker swarm join \
    --token SWMTKN-1-0hlhela57gsvxzoaqol70n2b9wos6qlu3ukriry3pcxyb9j2k6-0n1if4hkvdvmrpbb7f3clx1yg \
    192.168.0.100:2377
We’ll check the status of the cluster nodes by running the following command on manager0:
[rancher@manager0 ~]$ docker node ls
ID                           HOSTNAME  STATUS  AVAILABILITY  MANAGER STATUS
366euocei01dw3ay66uwzb3pv    worker0   Ready   Active
67pt4fo5gi13cxkphtfzfbfbo    worker1   Ready   Active
8gf95qb6l61v5s6561qx5vfy6 *  manager0  Ready   Active        Leader
Docker Swarm is ready!
By default, new services will be launched on all nodes in the cluster. We’ll change this so that services are only launched on nodes worker0 and worker1, and manager0 will only act as manager.
To change these parameters, we’ll change the “availability” of manager0:
[rancher@manager0 ~]$ docker node update --availability drain manager0
We launch the service with the Nginx container:
[rancher@manager0 ~]$ docker service create --name webserver --replicas 1 --publish 80:80 nginx
We get the service identifier in response:
av1qvj32mz8vwkwihf0lauiz8
The initial number of replicas will be 0, and the only task related to this service will have the status “Preparing”:
[rancher@manager0 ~]$ docker service ls
ID            NAME       REPLICAS  IMAGE  COMMAND
av1qvj32mz8v  webserver  0/1       nginx
[rancher@manager0 ~]$ docker service ps webserver
ID                         NAME         IMAGE  NODE     DESIRED STATE  CURRENT STATE                 ERROR
cjxkza3qzx5m73bgbls0r26m6  webserver.1  nginx  worker1  Running        Preparing about a minute ago
After a few seconds, the required Nginx image will be automatically downloaded from the Docker Hub, after which the service status will change to “Running”:
[rancher@manager0 ~]$ docker service ls
ID            NAME       REPLICAS  IMAGE  COMMAND
av1qvj32mz8v  webserver  1/1       nginx
[rancher@manager0 ~]$ docker service ps webserver
ID                         NAME         IMAGE  NODE     DESIRED STATE  CURRENT STATE          ERROR
cjxkza3qzx5m73bgbls0r26m6  webserver.1  nginx  worker1  Running        Running 8 minutes ago
As we can see, the service was launched on worker1 (the value under the “Node” column). We’ll turn off this node from the VPC control panel and recheck the status of the webserver service:
[rancher@manager0 ~]$ docker service ps webserver
ID                         NAME             IMAGE  NODE     DESIRED STATE  CURRENT STATE             ERROR
5lwf4z54p74qtoopuilshw204  webserver.1      nginx  worker0  Running        Preparing 32 seconds ago
cjxkza3qzx5m73bgbls0r26m6   \_ webserver.1  nginx  worker1  Shutdown       Running 16 minutes ago
The status has changed to “Preparing”. Docker Swarm is trying to move the service to another working node, worker0. The delay is because the Nginx image from Docker Hub should be added to worker0 before it’s launched.
After the image has successfully been added, the webserver service successfully launches on node worker0:
[rancher@manager0 ~]$ docker service ps webserver
ID                         NAME             IMAGE  NODE     DESIRED STATE  CURRENT STATE               ERROR
5lwf4z54p74qtoopuilshw204  webserver.1      nginx  worker0  Running        Running about a minute ago
cjxkza3qzx5m73bgbls0r26m6   \_ webserver.1  nginx  worker1  Shutdown       Running 19 minutes ago
To avoid crashes when moving services from a dropped node, we can increase the number of replicas of the service.
We run the command (don’t forget to start worker1 back up):
[rancher@manager0 ~]$ docker service update --replicas 2 webserver
The service starts to replicate on the second node, worker1:
[rancher@manager0 ~]$ docker service ps webserver
ID                         NAME             IMAGE  NODE     DESIRED STATE  CURRENT STATE            ERROR
5lwf4z54p74qtoopuilshw204  webserver.1      nginx  worker0  Running        Running 11 minutes ago
cjxkza3qzx5m73bgbls0r26m6   \_ webserver.1  nginx  worker1  Shutdown       Complete 6 minutes ago
f3o7icke69zw83ag92ywol0dr  webserver.2      nginx  worker1  Running        Preparing 2 seconds ago
Conclusion
In this article, we took a brief look at Linux distributions that were designed for quickly deploying and easily managing clusters from isolated containers.
We’d like you to share your own experiences with CoreOS, RancherOS, and similar operating systems in the comments below.